
FIX UI
Chronicle FIX UI streamlines the configuration, maintenance, and monitoring of FIX sessions, providing a user-friendly graphical interface for querying historical FIX messages. Key UI features include:
Visualized information on all configured sessions, their working status (active, inactive, etc.), and live sequence numbers.
Control buttons for changing the working status of sessions.
Input panels for editing session configurations or resetting sequence numbers.
The intuitive interface for configuring sessions and the FIX engine offers:
Configuration parameters displayed in a single panel, with required fields clearly marked.
Drop-down menus for parameters with limited options.
Configuration fields can be populated from a YAML configuration file or exported to one, making it easy to switch between UI and code-based management.
Search capabilities for historical FIX messages by field name, tag number, SessionID, free text, or combinations thereof.
Human-readable display of FIX messages, with detailed information about each field (e.g., tag number, field name, and value).
An interactive environment to prevent and detect errors during configuration.
Handy information on configuration parameters.
Alerts showing errors or warnings with detailed information in a familiar Java style.
Routing Rules
In the Routing Rules tab of FIX UI, routing rules applied to the inbound messages of routers can be defined and modified. This allows for the inbound FIX messages of a router to be forwarded to different destinations based on standard and bespoke tags. Figure 1 shows an example routing rule; all messages that meet the condition SenderCompID (tag 49) value is equal to "UPSTREAM" and TargetCompID (tag 56) value is not equal to "INTERNAL_3" will be routed using this routing rule. In other words, they will be sent to sessions with sessionIDs "ROUTER:INTERNAL_1" or "ROUTER:INTERNAL_2" using the ROUND_ROBIN policy.
Figure 1. Example routing rule
To add a new routing rule, click on the "Add New Rule" button, a new panel appears, as seen in Figure 2, and be prompted to fill in the routing rule properties. As indicated the borders of fields are initially in red, when a valid value is entered for a property the border turns green. Routing rules properties are:
Pattern: This specifies the conditions which must be met for tags of a FIX message in order for the message to be forwarded to the specified Routes of this routing rule. The patterns are defined in expressions similar to the way Routing Pattern of a FIX Router is defined. These expressions consist of the following elements -
Pattern Element | Details |
Operators | ==, !=, <, >, ⇐ , >=, =~ (regex match), !~ (regex not match) |
Logical operations | "and", "or" and "not" |
"has" | Checks presence of a tag |
parentheses | Used to disambiguate expressions and/or clarifying the order of operations |
"$" | Should precede tag numbers |
"@" | Should precede tag names that have already been associated with tag numbers |
Policy: The strategy to select one of the specified routes in the Routes property if there is more than one. It can be set to the following options -
Routing Policy | Details |
ROUND_ROBIN | The routes are selected in the order they appear in the Routes list |
ORDERED | Always the first route in the Routes list is selected unless it is unavailable |
ALL | Broadcasts messages ie sends messages that match the defined pattern to all specified Routes |
Routes: The list of available sessions that FIX messages are routed to if they match the
patternof this rule. Sessions with Downstream type can be selected from the dropdown menu.
Figure 2. Adding a new routing rule
The order of routing rules is important, a message is routed using the first routing rule it matches. There is a drag-and-drop icon at the left of each routing rule that allows changing the order of rules by dragging them up or down.
Setting |
1. Defining Dictionary for FIX Tags
In order to use tag names instead of tag numbers for defining routing rules or search queries, tag names should be associated to arbitrary names. This can be done in the following two ways. Both ways can be used simultaneously too.
Using the
fieldManifestClassproperty: A class that associates tag numbers with tag names can be defined and plugged in Chronicle-FIX-UI services.yaml using the propertyfieldManifestClass. This property should be set in bothfix-web-gatewayandfix-engineservices configuration block. Below shows an example configuration forfieldManifestClassand code generated classsoftware.chronicle.tmp.fix50SP2.FieldManifest. Thesoftware.chronicle.fix50SP2.FieldManifestclass associates FIX tag numbers with tag names based on FIX 5.0 SP2 dictionary.
Example configuration of the fieldManifestClass property.
# This is used to build up the full set of fields in the dictionary
fieldManifestClass: !type software.chronicle.fix50SP2.FieldManifest,
software.chronicle.fix50SP2.FieldManifest
package software.chronicle.fix50SP2;

public interface FieldManifest {
    int Account = 1;
    int AccountType = 581;
    int AccruedInterestAmt = 159;
    int AccruedInterestRate = 158;
    // ...
}
A customised fieldManifestClass can be defined and plugged in.
Using the dictionary block: The dictionary is defined in the
services.yamlfile in the dictionary blocks in bothfix-web-gatewayandfix-engineservices configuration blocks. The following example shows FIX tag 49 (FIX name:SenderCompID) has been associated with the name "sender" and bespoke tag 99123 with "ourFirmBespokeTag".
Example defining dictionary
dictionary: {
  ourFirmBespokeTag: 99123,
  sender: 49
}
By defining this dictionary, instead of $49 == "UPSTREAM" or @SenderCompID == "UPSTREAM", the user-defined form @Sender == "UPSTREAM" can be used when defining routing patterns. Note that the associated names with the tags are not case-sensitive. Standard tag names can be used instead of tag numbers without being defined in the dictionary as they have already been defined using the fieldManifestClass property in services.yaml.
Sessions
Selecting the "Sessions" tab displays a list of all configured sessions, along with the following information:
Session Info | Details |
SessionID | The first column titled "Sender:Target" shows the SessionID of sessions. |
Type: Non Routing | Indicates the session is between two FIX engines (acceptor-initiator) |
Type: Upstream | Indicates the session is between a FIX router and a FIX engine, and that the incoming messages from the engine to the router will be routed to a Downstream session according to the defined Routing Rules |
Type: Downstream | Indicates the session is between a FIX router and an FIX engine which is a destination for Routing Rules |
ReadSeq/WriteSeq | Read and write sequence numbers |
Status: ONLINE | Session is active and connected to a counterparty |
Status: OFFLINE | Session is active, but not connected to a counterparty yet eg acceptor waiting for connection |
Status: INACTIVE | Session is deactivated |
Status: INVALID | Session configuration is invalid - ie it was not accepted by the FIX engine for some reasons. There also can be a "warning button" near the INVALID badge as Figure 1 shows |
View | There is a view icon at the end of each session row that by clicking on, the UI will switch to the Search tab and shows historic FIX messages for this session |

Figure 1. INVALID session
The warning button opens the "Notifications" tab within the FIX UI, filtering all notifications by the session ID, to provide information about the problem, see Figure 2, see more information in Notifications.
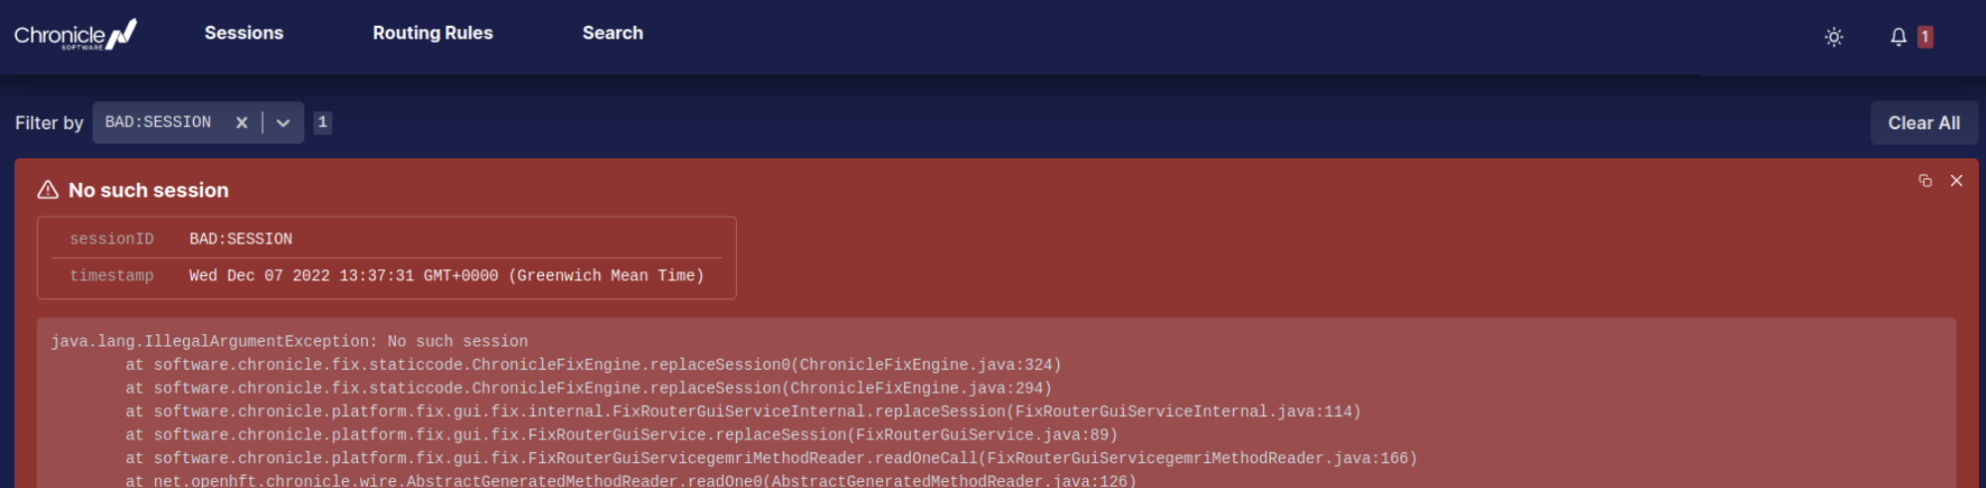
Figure 2. Notifications are filtered by session ID "BAD:SESSION"
Selecting a session (a row) turns it orange as Figure 3 shows. Each supported operation on the selected session is indicated by an icon located above the list in the top right corner. These are explained in detail below in Session Operations. An "Add New Session" button also appears above the list, allowing the addition of sessions.
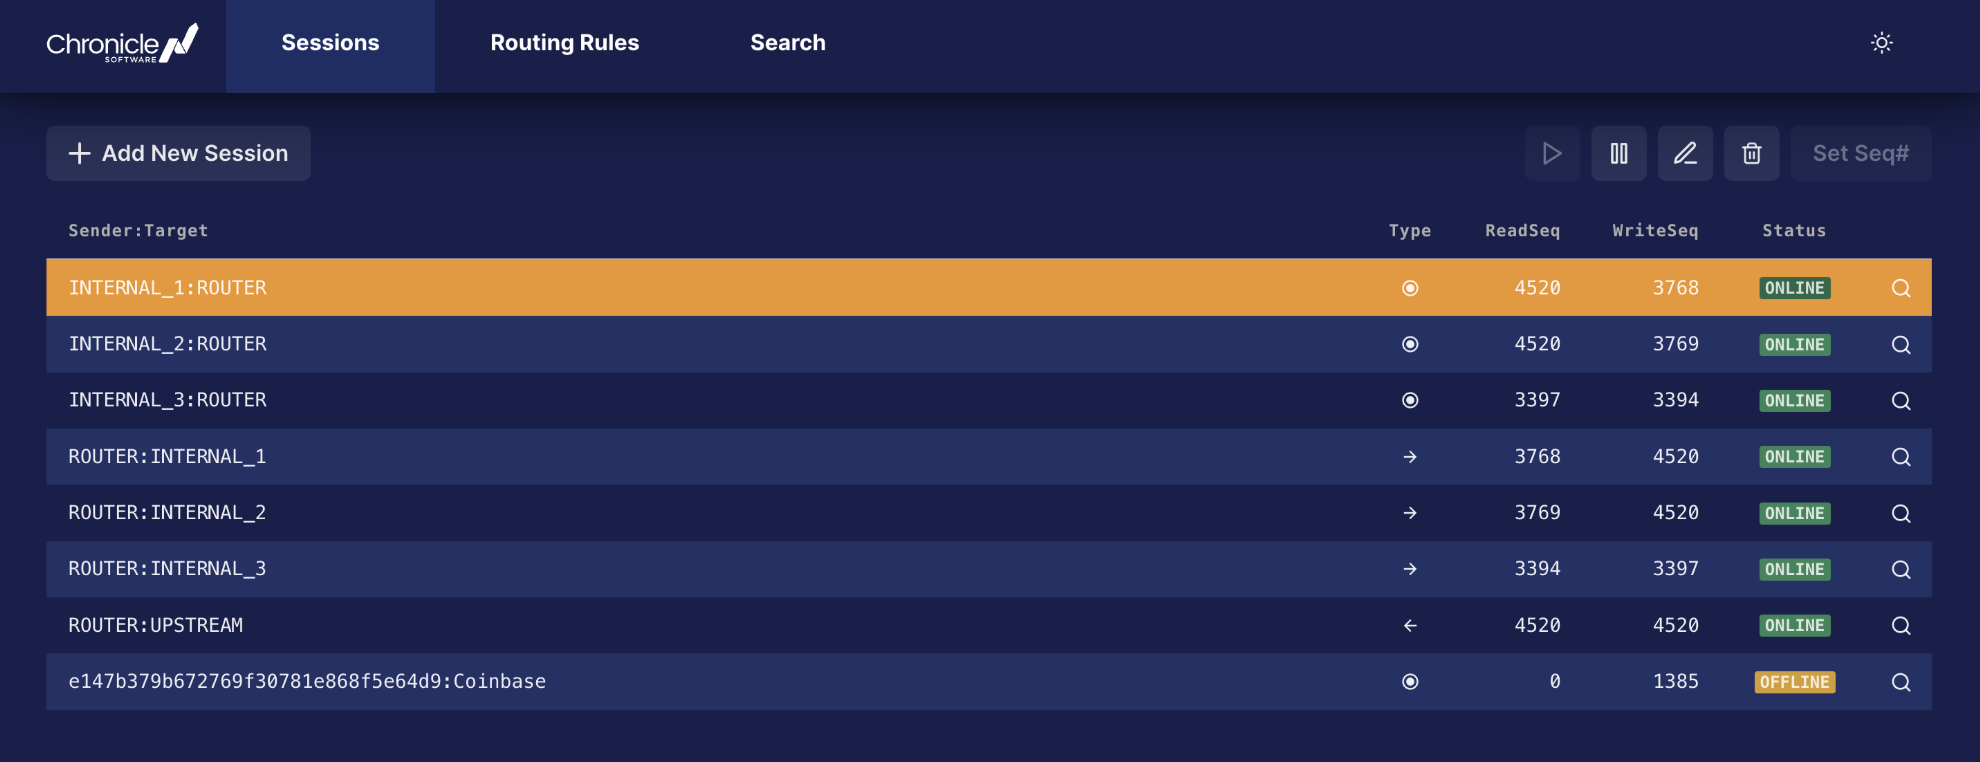
Figure 3. Sessions list
1. Adding a New Session
By clicking on the "Add New Session" button, a window titled "Add Session" appears that allows the configuration properties of a new FIX session in the input boxes to be set. Properties marked with a red star are mandatory and must be set. Clicking the info icon next to each input field opens an information window about the field. The "Add Session" window is shown in Figure 4.
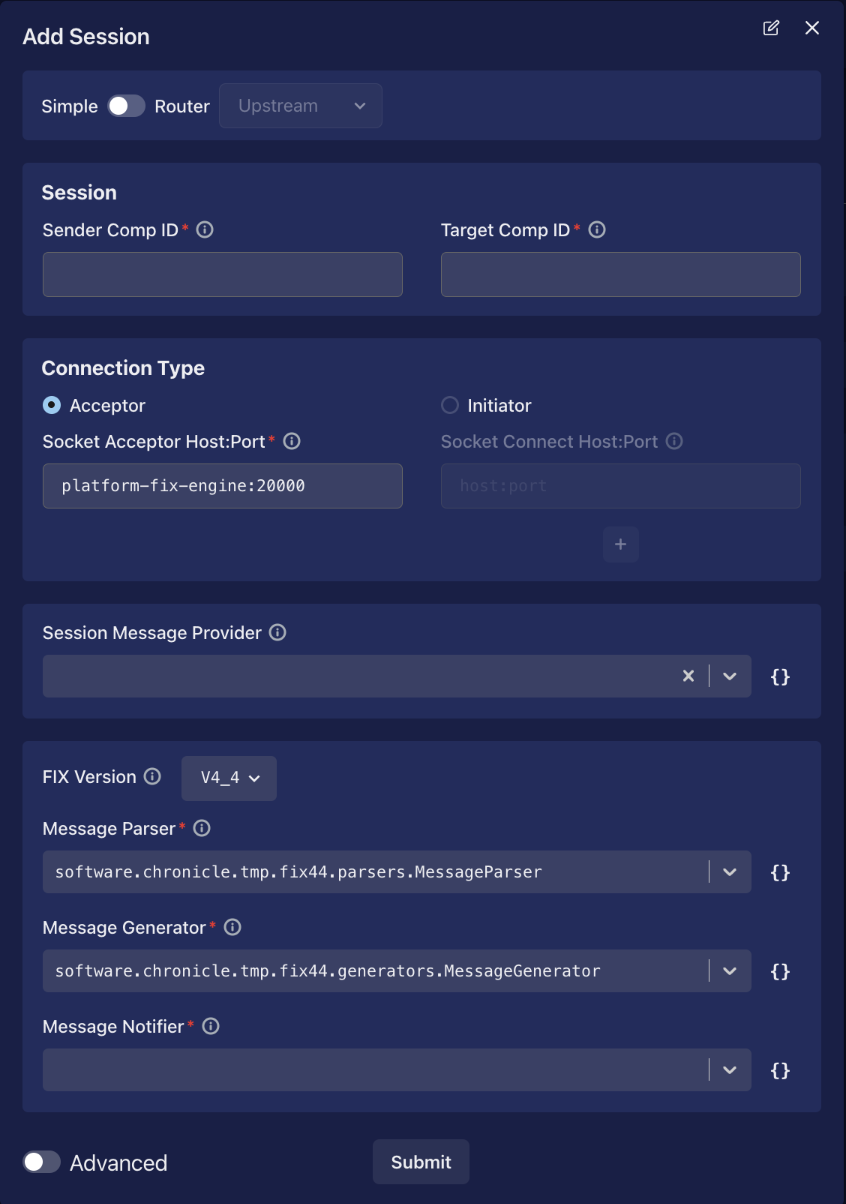
Figure 4. "Add Session" pop up window
At the top of the window a switch allows selecting the type of the session; Non Router or Router. The former defines a session between two FIX engines (acceptor-initiator) and the latter between a FIX engine and a FIX router. In the latter case the session could be an upstream or downstream session as explained above.
As well as being able to edit the configuration properties in the form directly, for power users, the YAML configuration can be viewed and edited, allowing for further customisation.
The YAML configuration is not well validated, thus it should be edited with caution. |
To view and edit the YAML configuration, click on the "Edit YAML configuration" icon in the top right corner of the pop up window. The "View YAML config" button appears next to some properties as well, so by clicking it the YAML configuration for the property is displayed, and the button will change to "View form input". Clicking on "View form input" changes the button back to "View YAML config" and the input form appears again.
The "Advanced" switch at the bottom of the window provides more configuration options when turned on, see Figure 5.
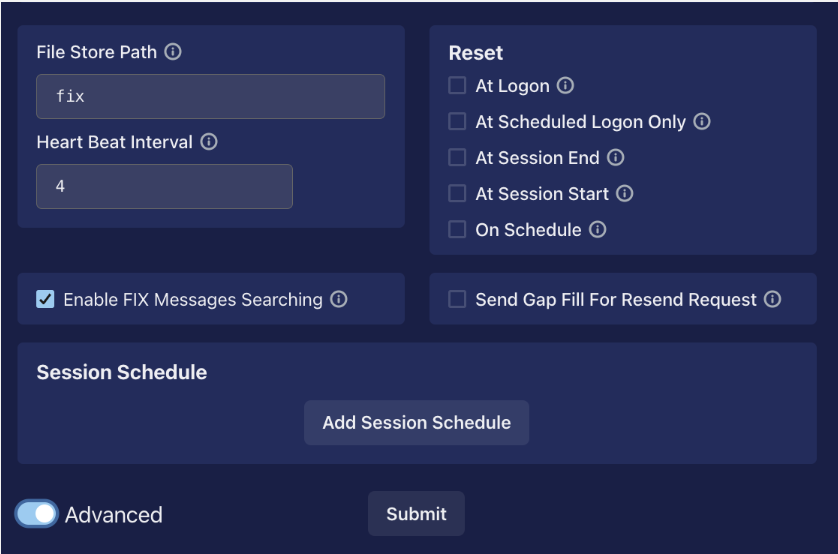
Figure 5. Advanced configuration options on the "Add Session" window
More information about each configuration property can be found in FixSessionCfg Properties. Dedicated sections for Comp ID, SocketConnectHostPort, Authentication, FileStorePath, MessageParser, MessageNotifier, Session Schedule, Sequence Number (information related to configuration fields in the "Reset" box) can be found in this User Guide. Moreover, the configuration of some fields are explained in detail below.
1.1 FIX Version
The list of supported FIX versions appears in the drop-down menu next to the FIX Version configuration parameter, see Figure 6.
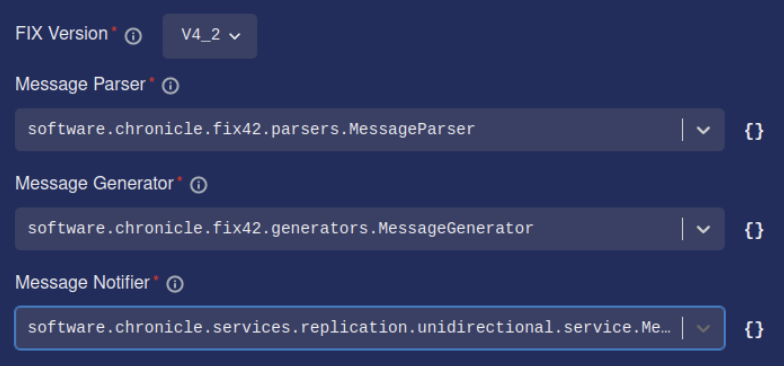
Figure 6. FIX version configuration
When a FIX version is selected, the drop-down menus for Message Parser, Message Generator and Message Notifier are updated to display only options which are supported by that version. For example, if the FIX version V4_2 is selected the Message Notifier’s drop-down only shows the available MessageNotifiers implementing the base class software.chronicle.fix42.messages.MessageNotifier.
There are base classes for Message Parser, Message Generator and Message Notifier for each version. To see these base classes refer to the "fixVersionHandlers" block in the "chronicle-platform-fix-gui/src/test/resources/software/chronicle/endtoend/standalone-fix-engine.yaml" file. For example, the following excerpt from the file shows software.chronicle.fix44.parsers.MessageParser is the base MessageParser for V4_4.
Excerpt from fix engine config yaml showing base classes for FIX V4_4 and 4_2
V4_4: !FixVersionHandlers {
  baseMessageParser: software.chronicle.fix44.parsers.MessageParser,
  baseMessageGenerator: software.chronicle.fix44.generators.MessageGenerator,
  baseMessageNotifier: software.chronicle.fix44.messages.MessageNotifier
},
V4_2: !FixVersionHandlers {
  baseMessageParser: software.chronicle.fix42.parsers.MessageParser,
  baseMessageGenerator: software.chronicle.fix42.generators.MessageGenerator,
  baseMessageNotifier: software.chronicle.fix42.messages.MessageNotifier
}
A customised class for any of these properties should implement the relevant base class. They can be uploaded to the UI following the below steps:
Develop the custom class by implementing the base class for that version eg a customised
MessageNotifierfor V4_4 should implementsoftware.chronicle.fix44.messages.MessageNotifier.Create the JAR file of the customised class and add it to the classpath as explained in Adding Custom JARs to the Classpath.
By restarting the UI, it will be uploaded to the UI and can be selected from the relevant drop-down menus.
To configure a FIX session to version 5.0 and beyond select T1_1 option. |
1.2 Session Message Provider
This configuration parameter is used to customise session-level messages for example setting exchange-specific fields in session messages. If this is required, create a class that implements VanillaSessionMessageProvider and override its methods as desired. Then upload the JAR of the implemented class as explained in Adding Custom JARs to the Classpath. It will appear in the dropdown menu of this configuration parameter. For more information see Customising Session Messages.
1.2.1 Sending Username and Password in Logon
LogonUsernamePasswordProvider is a customised SessionMessageProvider for sending username and password in Logon messages. Therefore, to make the FIX engine send username and password in Logon messages select LogonUsernamePasswordProvider in the drop-down menu. "Login" and "Password" input fields will appear where the desired username and password for this session can be set.
See Logon/Logout Callbacks to find out how the username and password that are received in a Logon message can be authenticated.
1.3 Session Schedule
The last field in the window - "Session Schedule" - schedules the de/activation times of the session with options for two types of schedule: DAILY and CHAINED, see Figure 7.

Figure 7. Scheduling de/activation of sessions
Clicking on the "Add Session Schedule" button, shows a dropdown menu with two options "Daily schedule" and "Chained schedule" for session scheduling. For more information on session scheduling, see Session Schedule.
1.3.1 Daily Schedule
After selecting this option, the window in Figure 8 appears, where it is possible to set the de/activation times and days for the session as well as the time zone. The selected days turn orange. In Figure 8, a daily session is scheduled to activate at 00:00 am and deactivate at 12:00 pm BST on Monday, Tuesday, Wednesday, and Friday.
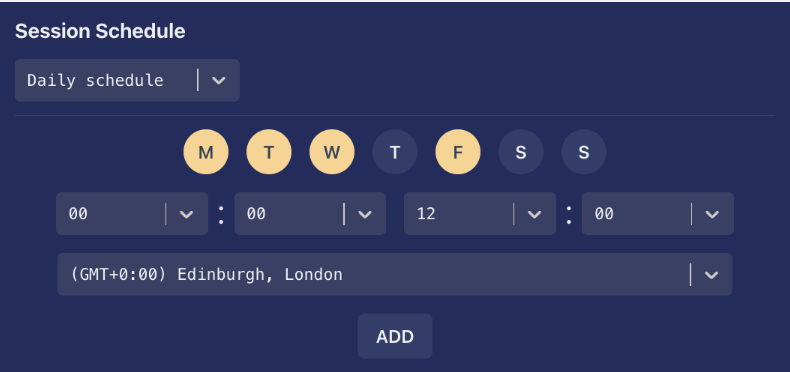
Figure 8. Daily scheduling
By clicking on the "ADD" button the window in Figure 9 is shown, indicating the session active times. In this way all the selected days will have the same de/activation time.

Figure 9. A session with DAILY scheduling
1.3.2 Chained Schedule
This type of scheduling can be used if a different de/activation time is required for each day or the de/activation time has to be spanned over more than one day. By selecting Chained schedule and clicking on the add button, the window in Figure 10 appears, letting users set activation and deactivation day and time of the session.
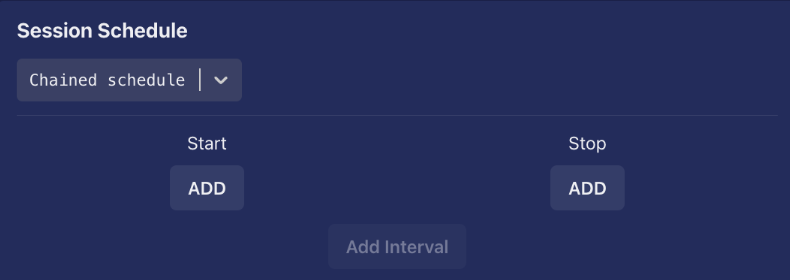
Figure 10. Chained scheduling
As an example, Figure 11 shows that a session will start on Monday at 8:00am and will stop on Thursday at 4:30pm. It is also possible to define several scheduling intervals.
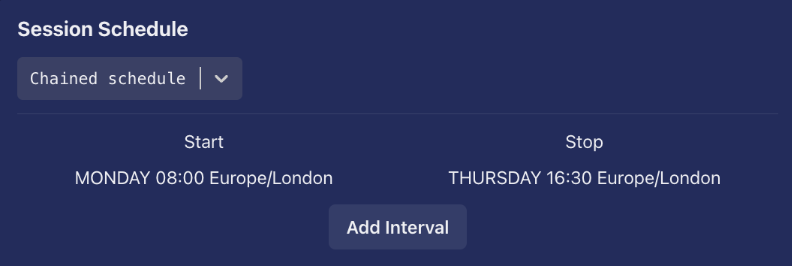
Figure 11. Chained scheduling
Chained schedule is a more powerful feature than Daily schedule, but it is also more complicated to set up. It is recommended to use the Daily schedule instead if it can meet the requirement. |
1.4 Enabling Processing Dynamic Fields
By default, Chronicle FIX ignores any fields that are not in the schema and raises a warning when encountering these fields. Support for these fields (aka custom tags or dynamic fields) can be enabled in the FIX engine by checking the "Enable support for fields not specified in schema" option on the Code Generator UI when generating code, see Generating the Code Using Chronicle FIX Code Generator GUI.
To configure a session to process these fields, pass unexpectedFieldHandler as an argument to the message parser in the YAML configuration and set the required handler. See different handlers provided by software.chronicle.fix.staticcode.parsers.UnexpectedFieldHandlers in Validation. In the UI, on the "Add Session" or "Edit Session" window, click on the "View YAML configuration" button on the up right corner of the window then in the MessageParser YAML configuration block add the UnexpectedFieldHandlers and set it to the required handler, then click on the "Apply" button. The following Figure shows the required changes. To have a better view, the highlighted section in the Figure has been repeated below the Figure, in which UnexpectedFieldHandlers.PROCESS has been used to handle dynamic fields.
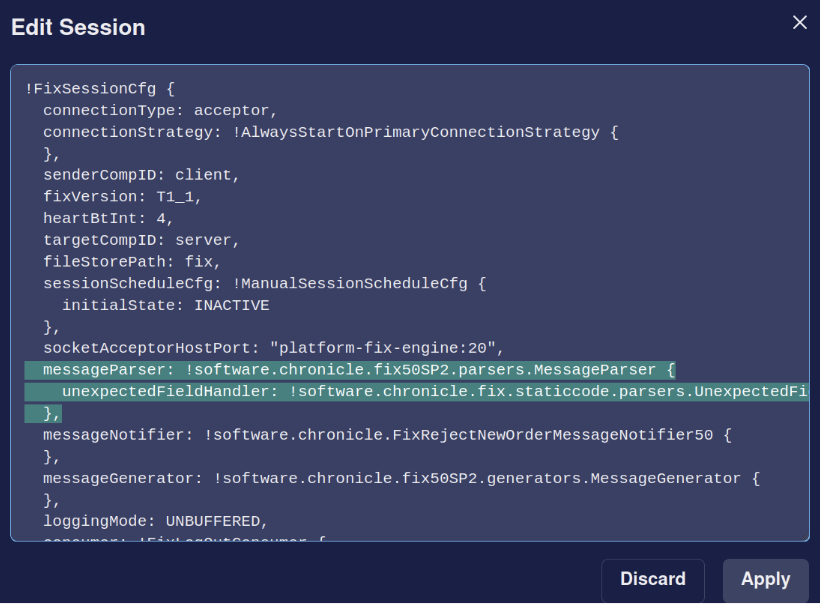
Figure 12. Configuring a session to process dynamic fields
Configuring a session to process dynamic fields
messageParser: !software.chronicle.fix50SP2.parsers.MessageParser {
   unexpectedFieldHandler: !UnexpectedFieldHandlers PROCESS
}
2. Session Operations
2.1 Activating / Deactivating a session
By clicking on the "Activate" or "Deactivate" icons the selected session will be activated or deactivated.
2.2 Editing a session
The "Edit" icon displays an "Edit Session" window similar to "Add Session" with the input fields filled in with the configuration settings of the selected session and allowing some changes to be made.
2.3 Removing a session
A selected session can be removed by clicking on the "Remove" icon.
2.4 Changing sequence number
By clicking on the "Set Seq#" icon a window pops up as Figure 12 shows where the read and write sequence numbers of a selected session can be set to new values. The new sequence numbers will be displayed in front of the session in the "Sessions" tab.
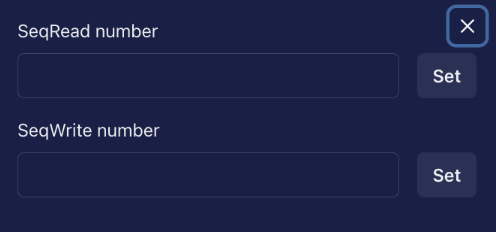
Figure 13. Sequence number reset pop up window
The sequence number of FIX sessions should be changed with caution, as incorrectly configured sequence numbers can lead to data loss. It is also not possible to change the sequence numbers while the session is running, so stop the session first. |
More information on sequence number is available in this User Guide.
3. Notifications
If problems occur in the FIX engine, an icon indicating the number of the messages appears at the top right of the UI, as illustrated in Figure 14 where the icon indicates there are three notifications.
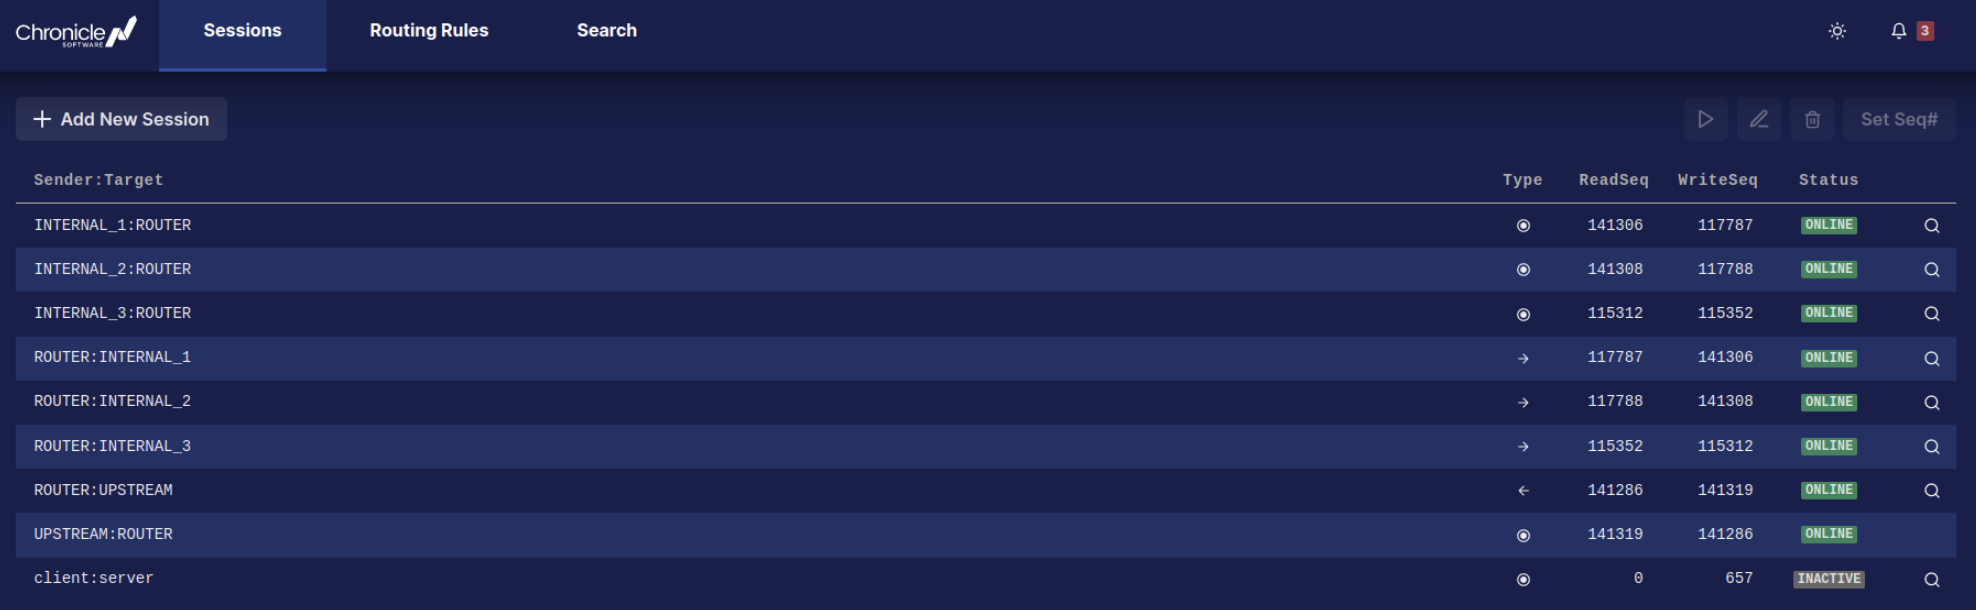
Figure 14. The number of notifications are indicated at the top right of the page
Clicking on the icon will open a tab for each notification, providing detailed information about the problem, see Figure 15.
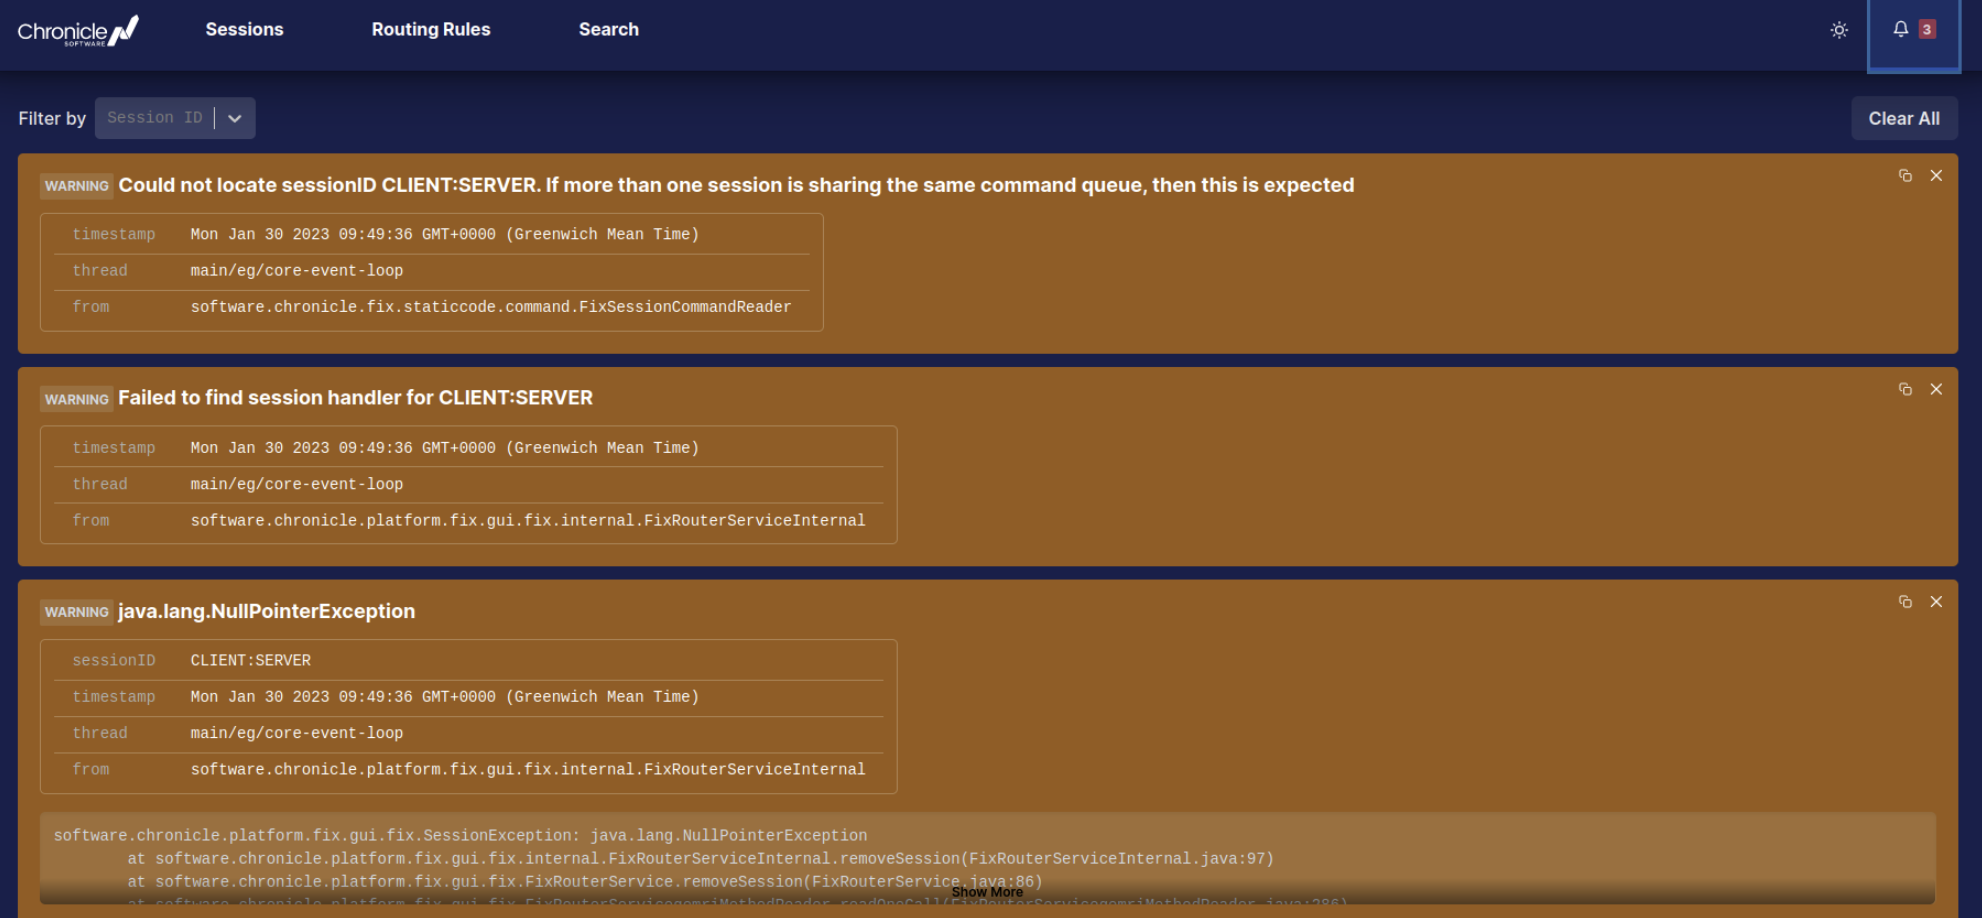
Figure 15. Information tabs for faults
Based on severity, notifications are classified as Errors and Warnings. An Error is a critical message, meaning something has not worked as it should, and that will affect the correctness of the expected result. eg error will appear, if FIX engine failed to add new session. A Warning means that happened something unusual, that need to be addressed by the user. eg warning will appear, if deprecated property was defined in a FIX session configuration. Warnings and Errors are indicated on orange and red panels, respectively. Each tab has a "Copy message" button in the top right corner that allows copying its information. This should be used to copy log messages when sending them to a support team to get help. Notifications can be filtered at session level using the "Filter by" drop-down menu at the top right of the page.
FIX UI doesn’t persist messages, so once the browser is refreshed or the "Clear All" button is clicked, they are no longer visible on the UI, even if the problems still take place. All logged messages can be viewed in the Docker container logs, using "docker logs" command. In the example below, the last ten lines from the platform-fix-engine container’s log are fetched.
docker logs platform-fix-engine --tail , -n 10
  timeInForce: "0"
}

[main/core-event-loop] WARN software.chronicle.fix.staticcode.CompIdSnifferWildcard - The following client session attempted to connect to the server, but has not been configured: senderCompId: UPSTREAM, targetCompId: ROUTER, fixVersion: V4_4